Chicken egg mosaic using broken chicken egg shells

Chicken egg mosaic with chicken egg shells died with pysanky dyes. This is kind of fun for those of you who like tiny pieces to put together in interesting designs. I actually had some old pysanky dyes which I probably should have thrown out, but instead I took some emptied egg shells, and crushed them, and put them into the dyes, letting them sit until there was color.  I just turned the eggshells out onto paper and spread them and let them dry.

Using a tiny bit of white glue, I positioned different colors of broken egg shell on a whole, but emptied, egg. When I wanted a dark grout like appearance behind the egg I used a black sharpie marker and colored the whole egg black then put the colored shells on.
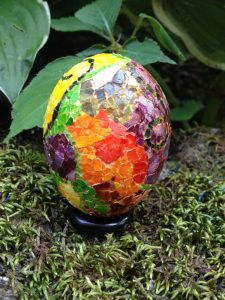
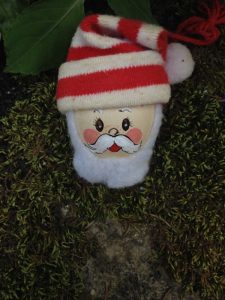
 IMG_1693

Finch egg pysanka: yep, tiny tiny

There are not many people who would try to do pysanky on a finch egg, but I did just that. Actually on several.  It is only fair to say that emptying the egg contents out of a finch egg is very very difficult, if not impossible, but I did try.  Then getting the tiny fragile egg shell to withstand being pressed under the dye water is difficult as well.  When finished (if IMG_7384
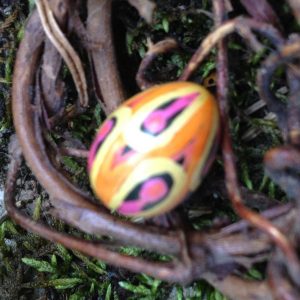
they make it that far) a good sneeze will blow them off a shelf onto the floor.  Haha.  This is one of those which has survived about 20 years.  My phone doesn’t do well with macrophotography (it is pretty old).

Pysanka egg 3

Chicken eggs which have washed in the machines for commercial use sometimes get scarred as they roll around hundreds of times on the belts that move them and that makes the pysanka dyes take unevenly.IMG_4022

So I went to google and asked “how are eggs washed commercially” and what came up, I read, and wasn’t really happy about what things were mentioned. I recommend that anyone who eats eggs, go to the website at the bottom of this page. So from this I suspect that the reason for the unusual dying qualities of commercially produced (meaning chicken mega-farms (hear this!! there are 60 chicken farms that have 5 million hens each… how do they keep them clean and healthy).  Washing eggs is not good for eggs, but when they are washed there are very definite do’s and don’ts. I will need to google Kroger eggs to see what they do to their chickens, chicks, and eggs.  Anyway, here is a pysanka made from a Kroger egg.

http://articles.mercola.com/sites/articles/archive/2010/06/08/why-you-dont-want-to-buy-organic-eggs-at-the-grocery-store.aspx

Pysanky: egg – blues and purple

I can remember exactly who first gave me a set of 3 or 4 pysanky egg dyes. I must have been middle aged, but for decades had tried to accomplish with traditional egg dyes and a paint brush the bright colors and fine lines found in pypysanky_egg_1
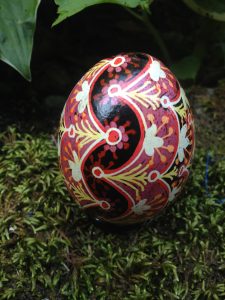
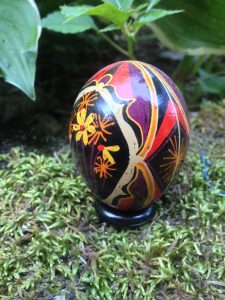
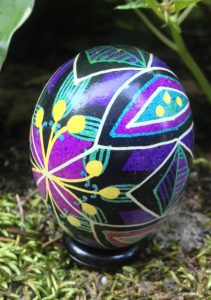
sanky eggs. Thank you Jan. You gave me years of fun and egg making.
Here is an egg that was given to a colleague sometime in the early 1990s. It is not ‘wonderful’ like some very well trained artists’ pysanka. It was returned to me when that person planned a move out of the country, so I thought I would share it.  Several others I will post as well.
I would recommend the Ukranian Gift Shop for pysanky dyes and kistkas, I have used them for years.

Perfectly peeled egg

This is a polymer clay and chicken egg construction. It was a little bit of a challenge.
1) chicken egg was emptied of contents
2) covered with about an 1/8 inch thick layer of peach clay (I don’t much care for Michaels brand polymer clay, its brittle, I feel, more than other brands)
3) cured and then a dremel was used to cut the spiral (which was probably not the best way to do this – in the future I would add the cane layer and cure it again before cutting)
4) I added the cane to the outside and wrapped the spiral around another empty egg for stability (I used a twist tie or two) then cured the egg again.
5) I sanded it with the supporting egg still enclosed, then punched in the supporting egg when it was smootweek_28_peeled_eggh.
6) Varathane coat was the last step — and now that it has sat in front of a hot kitchen window, it is beginning to slump a little.  So there you have it, not everything works out the first time. I positioned it on its side…. and that is more interesting anyway.

Clown – egg head with moveable eyes

week_29_egg-head
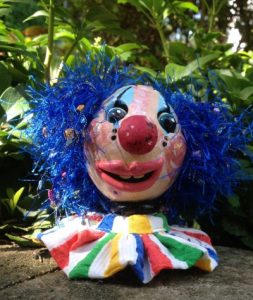
Smirky little grin on this egg, made from a chicken egg, polymer clay, fabric and yarn, and a little bit of paint and Varathane. Many steps here:
1)   removing the egg contents (scrambled and consumed)
2)   covering the egg with a thin rolled out layer of peach colored polymer clay and curing for 30 min
3)   drilling out the eyes and mouth and back of head for a working approach to put in the eyes;
4)   making polymer clay eyes, adding screw eyes and weights to the back of each of the eyes and painting the white highlights
5)   building up the nose and mouth and re-baking
6)   using a bent paper clip to create an arc through the eye beads, and hot gluing that in position making sure the eyes could flutter up and down, then using button thread to connect the screw eyes and tied-on weights up through a hole in the back of the head
7)   using hot glue (carefully so as not to melt the polymer clay) to seat the back of the head where it belonged and adding hair
8)   threading the button thread for the eyes through a little blue bead and tying it off (so the threads wouldn’t slip back into the egg cavity
9)   building a stand (sawed off plastic thread bobbin)
10)   making a ruffle.


A very bad hair day?

Little girl here doesn’t like her hair-do, but like most things in life, bad hair days are just temporary. I can tell from the wild rounded lines that there was emotion in those buns on the side of her head.  LOL. But, on the other hand, how nice to have such abundant, long black hair, and I think little girl is still beautiful. It gives us pause to think: how we see ourselves is important, and it colors how we feel at any given time.  Think – good things. @2016