Pumpkin with fluorescent interior

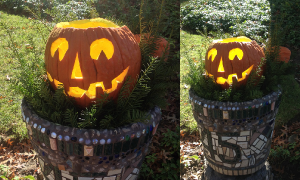
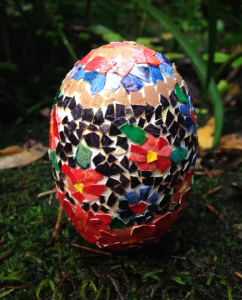
I invented something funny here, at least I didn’t copy anyone else, but probably somewhere in the world someone has made carved a pumpkin like this and made the interior fluorescent.  The idea came to me after I made a little pumpkin egg sculpture out of polymer clay (found HERE), and then I wondered whether I could make it into an actual pumpkin size carving.

  1. carve the pumpkin
  2. scrape the edges really well, and pat dry
  3. wait until the interior is pretty dry to the touch (I ended up putting this whole big pumpkin in the oven at just over 100 oF for an hour or so.
  4. Paint the interior with a stain blocking primer (I used water based Kilz) and let that dry for several days.
  5. Spray paint the interior of the pumpkin with fluorescent yellow spray paint (well I used spray paint, but I think a jar of paint would have been a better idea.

fluorescent_pumpkin

Dragon egg: polymer clay

This little egg was a construction nightmare to create. I don’t know how many processes of curing it took. I know getting the center continuation of the little dragon’s body was the toughest part.  I like his tongue sticking out, ha ha.  It began with a real chicken egg, as most of the eggs on this blog.

dragon_egg


All craziness in a polymer clay egg with glass eyes

This egg was totally NOT fun to do, so many problems, and if you shook this egg you would find that one of the “glass eyes” was actually inside… ha ha, which I replaced with a clear marble after the fact. This egg was first covered in translucent polymer clay, then cured, and then I drilled out 5 or so holes, and used polymer clay to “seat” some glass globs within those holes. I cured it again, and added some of the stringing detail, then more and and more, and finally decided to cut my losses on this particular design.  It looks like something “frosted” for a birthday.  I use “primer” to paint the eyes, then put in the pupil, and then fluorescent yellow paint to make the white part glow.  “certified”  ha ha.

glass_eye_egg

Egg and polymer clay: Pumpkin with fluorescent interior

This egg was certainly fun to make. I used the roundest of the chicken eggs I had previously blown the contents from, then made wedges (thicker center than edges) to put around the equator of the egg top to bottom making the egg appear rounder and giving the pumpkin ridges.  I smoothed the wedges together and before curing i scored the areas for the eyes and nose and mouth and teeth and the top scallop where I could cut out the top.  the hole in the egg (to let the hot air escape during curing so as not to cause bubbles) was saved for the stem.  I sanded the egg lightly then cut the eyes and nose and mouth and top part out using a razor blade, trying not to break the whole egg.week_43_pumpkin-egg

After pieces were separated I used a blade to carve the edges clean, and sanded smoother (i didn’t sand this as smooth as i could have…. I am not that good a craftsman and bore too easily).  After sanding, i made the eyes of black polymer clay and added the stem to the lid, put a black ring for a stand, made a small candle which I placed in the interior and cured the egg again.  After some more sanding, I sprayed some fluorescent yellow paint into a plastic cup (one from the sampling at Kroger LOL, that I would feign to throw out) and painted the inside of the pumpkin (white eggshell still present acted as a nice white base color).

In the sunlight the eyes mouth and nose show up pretty nicely.  It is a fun idea, and would be a good craft for the kids.


Bones (skull) egg: fun for halloween

This silly skull egg was made with a fluorescent powder (recommended by Ginger in blue bottle tree) and translucent polymer clay.  I kneaded in as much as I thought I could get away with, and the clay felt a little chalky.
Apparently I needed more.  It does glow a little in a dark room, but not enough to get a picture on my phone.  So here are two sunny views of the three toothed cranium and mandible.. ha ha… all made over an egg.

bones_egg

First basic layer was made (leaving eye and nose and mouth without polymer clay, and after the first curing, i just chipped out the eggshell in thoweek_39_fluorescent-skull
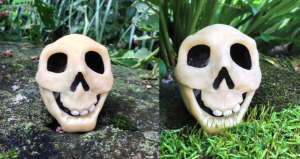
se areas, and sanded around and chipped some more.  I then added the mandible and ridges over the eyes and zygoma and figured in where the teeth should go, and cured it again.  Lastly, I added the three teeth (the hardest part, ha ha), cured again, and painted with black and brown acrylic paint the inside of the head.  I thought about using pencil or ink to mark in the cranial sutures and foramina… ha ha. I am not totally sure why this guy looks so smiley for a skull.