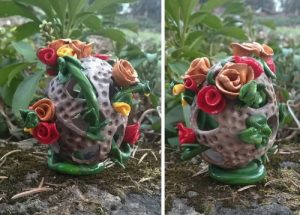
This egg surely was a surprise to try to finish, not the best egg in the world by a long stretch. I began by covering a small chicken egg with a rolled out layer of glitter-red fimo, marked out circles on that layer, then cured. I punched (with a push pin) out the circles (and saved them LOL) and then added a layer of orange, cutting out the holes over the original holes (for each additional layer similarly), then cured again, and added a layer of fluorescent yellow with additional fluorescent powder added), then cured, then a layer of green, and cured again. I put all the left over colors together to create a mokume gane for the top layer. When the egg was warm after each cure i tried tied to trim any extra clay off each of the newly added color. I chipped the egg shell out after all layers were cured. BTW, have you ever tried to sand the inside of such a structure. I could not find a tool, but finally put a pencil thin stiff bristle paint brush in the end of my variable speed drill. That worked a little, but finding the right angle for brushing off the inside of the areas between the holes was challenging.
When I began sanding I found that some fracture lines had appeared that I could not sand away. I don’t know whether I should have put all the layers on soft, right from the start and cured once….if perhaps each layer shrank and c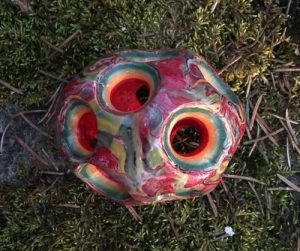 racked with the addition of each new layer? It seemed that the fluorescent yellow was the breaking point, but I would have to try to recreate the error, requiring several eggs to be made again (probably not happening). If I do try another layered holey egg, keeping all layers soft before curing it just once, it will be a black and white checker board egg…. It wont be a perfect test though, since the fluorescent layer wont be there. BTW, the fluorescent layer did look cool in the dark.
After hours of unsuccessfully sanding out cracks, I just decided to cut my losses. The picture is terrible, it really is kind of an interesting sculpture.
 this is a test of whether i put the html code i got off the internet in the right place in my word press blog. the goal was to wrap the text around an object which is round. incidentally this pix was a medallion painted for a church and it represents the apostle jude – a ship on a stormy sea. the answer to word wrap is-that NOPE i didnt get it right. But my son did, and you can view it in chrome but not firefox or old browser versions of explorer