Paper egg and polymer clay

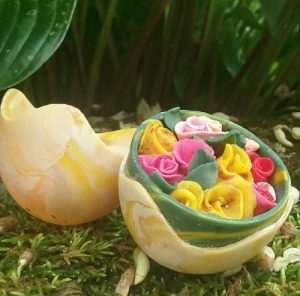
I purchased this large (maybe 4.5 inches high) paper mache egg from Joann Fabrics in the 70% off bin after easter this year.  I thought I could use it as a form on which to work some polymer clay to make a large polymer clay egg.

Not entirely successful, there were some surprises. I did poke a hole in it during baking (tiny at the bottom), and it was firm enough to easily put the clay upon. I did this in about 4 curings since didn’t want the shapes to get squeezed out when I added other slices.  This might have been a mistake… maybe doing it all at once would have prevented two problems.  1: it has taken a lot of sanding to try to get rid of the small deviations and divots in the surface, i mean a lot of sanding, perhaps an insane amount of sanding.  Not all were removed to my satisfaction so i filled some of the deeper depressions with new thin slices of polymer clay, which brought on problem 2: the different areas of polymer clay looked like they shrank away from each other with the last curing.

THis is another example of the choice to “cut my losses” or to try to figure out whether i can save this egg, and turn it into something nice.  I wish there were a forum to ask this advice, but enabling comments on wordpress is just asking for trouble.

Egg box with flowers, sunny side up

polymer clay and egg shell sculpture art

This was a fun egg to make. I covered the egg with a blend of translucent, yellow, salmon, white polymer clay and before curing carved out a serpentine line around the equator where I wanted to cut the egg after it was cured. This i sanded until smooth with 240, 400,  800 and 2000 grit sandpaper.  I used a razor blade and a push pin to separate the two halves, picked off the egg shell from the top half and around the inset portion of the bottom half and sanded the edges to soften and even up the two pieces as they fit together.

With green clay-mix i made a band for the inside of the bottom half of the egg box where the top half would fit over to close the egg box.  i cured this WITH the lid in place but coated the inside of the top half with baking soda to prevent the two halves from fusing, but also while maintaining the “fit”, as I was afraid one or the other half would warp during curing.

Next i covered outside a small portion of an egg shell with liquid polymer clay to give it a little extra strength, and also put liquid polymer clay on the inside of the edges of the egg box where the inverted portion of egg shell was placed to make a “platform” upon which to rest the flowers.  I cured the whole egg “with shelf” again (with the top on)…and with the baking soda to prevent fusing the lid to the box.  The shelf completed, i just pressed the rolled roses (lightly) roses and fit leaves between, onto the dome shape made with the inverted egg shell inside the bottom of the box. Just fun, nothing fancy or difficult.

Redo: polymer clay and chicken egg

I never really liked this egg, made with a cane that was supposed to look like a quilt. (It does have flower petals in it, from a person who was a quilter and I was trying to make some kind of a keepsake egg in commemoration.)  Some how it was a little too chaotic and I wasn’t that happy with the colors. So the other day i decided to cut it in half (not difficult with a blade and a pin to poke through the two layers (first layer was translucent polymer clay) and twist the two two halves apart. The purpose was to insert a row of flowers between the layers to look like they were kind of “trapped”.  I added some black paint (which didn’t take that well) behind the flowers to accentuate.  Education is costly sometimes, in terms of time, but unless I learn by experimenting, I go nowhere.