Holey spiral cane egg and flowers

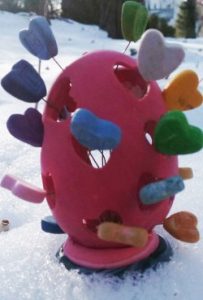
This was another in a series of holey eggs (notice i did not say holy). I like the dimensionality of the eggs that have little tunnels for light to show through to the front and the rigid egg structure forms a great base for keeping the clay stable while it cures. THe logistics of getting the flowers to stay put took a little planning.
I covered an emptied with white Fimo, then before i cured it i marked out with a round cutter what areas I was going to excavate. Before curing also, i removed the uncured clay from those rounded areas but kept the eggshell intact until after it was cured and fairly rigid. ( i use small eggs generally, as adding two layers of polymer clay sheeting can ultimately create really big eggs… ha ha.
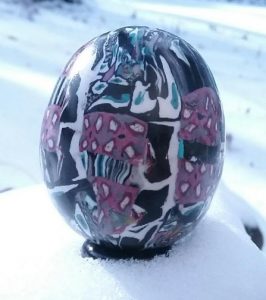
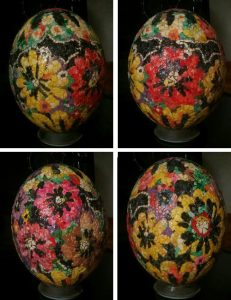
I created a spiral cane that incorporated rose petal leaves as a memorial (dark red specks seen in the red and pink and white and yellow clay are rose petal pieces)(these were from a customer’s funeral bouquet), using various shades of red and yellow and white, which i sliced thinky and applied to the egg (keeping the holes in the second layer of clay visible…and cutting edges of this layer out from the hole areas.
After curing i punched out the egg shell carefully from the holes, and sanded the outside of the egg, as well as the holes. free polymer clay instructions and advice from an amature
I used a wire armature covered first with a thin coil of green clay then worked as a smooth casing for the stems of the flowers, and secured the flower to the end of each wire with a green polymer clay flower center and then cured all the flowers with their stems separately. After that cure I trimmed off the polymer clay up to just 1/4 inch above the length I wanted to have the stem be…. exposing just a little wire on each flower, just enough to push into uncured clay to keep them upright.
Then i pushed and molded some green polymer clay into the bottom center of the egg, shoving it through several of the holes and packing it down using the end of a pencil.
I dipped the wire (that is, the bottom end of each of the the green stems with pink flowers)  in a little liquid sculpy, hoping that this would help the stems bond with the central lump on the bottom inside of the egg once i pushed the wire ends of the flower stems into it. When all flowers were arranged I cured the egg for an hour at 265 (previous cures were just long enough to harden the parts, so not a good cure….but just enough to allow me to work with the flower parts).
Three little green feet act as a stand…. i think i would have preferred, in hind sight, to have a translucent ring for a stand instead. Left and center images, side view, right image is a view from the top (taken indoors)

As is typical for me,  this still needs a lot of work (mostly sanding)… i am so bad at tending to those final details…  btw, no varathone on this egg…. dont know what my reasoning is there.

Stamped floral polymer clay egg

This egg was made by covering an entire egg (don’t forget to poke the hole in the bottom to let the hot air out during curing) with a very thin layer of translucent polymer clay and cured the egg.  The purpose of this was to give the egg shell some stability so that when i pressed the stamp onto the next layer of polymer clay (a pretty thick layer of translucent polymer clay) it would not crush the egg shell. steam punk polymer clay impression egg

I did this second layer near my stove-top and oven to keep the clay pretty warm (so it was/is winter, and the house is barely 62 degrees, not conducive to conditioning clay) so that when i used a stamp (one found in a collection of rubber stamps) to impress the floral pattern on all sides it would make a deep impression. It was important NOT to cure the egg a second time before totally finishing the stamping and impressing the lines which might have become blurred  (this has to be pretty obvious).  I actually rolled it smooth a couple of times before i figured out how to handle the egg so as not to flatten out the embossing on the opposite side.  Egg was cured, cooled, sanded just a little bit, and a gloss medium mixed with various colors of acrylic paint just dobbed on the surface to highlight the impressions.  It was a fun technique to try, I think maybe at some point i will try it again.

It looks a little like steam-punk.  Ha ha, if i had used a metallic paint and black and grey it might have looked like metal.  That would be kind of fun, and one could use nuts and bolts and screws and washers and lock washers and gears and hex wrenches and screwdrivers etc etc to make the impression of common metal objects


Maltese cross polymer clay cane on egg shell

This was a simple egg, not that spectacular, but a test to see whether i could put a maltese cross cane on an egg and maintain the shape of the cane slices.  Result is that I could use more practice, but also kind of a nice egg.

I used a marbled black-red-white polymer clay mix for a border for the cane and this produced an irregular effect. I haven’t decided whether I like that effect or not, but in some circumstances it is useful to have experimented.

Photograph after a winter snow – ha ha.

polymerclay cane cross red black easter egg

Holey egg with multicolor rows

A large chicken egg was emptied, washed and covered with a thin layer of translucent clay. (would that i were able to purchase the expensive translucent clay… ha ha… this is Premo) with areas to be removed scored with a knife, and then cured. The early cures i don’t worry too much about time, just enough to make the clay hard enough to work with.  (dont forget to poke a hole in the bottom of the clay covered egg to prevent the little “blister” from expanding hot air — this is a nemesis for me, i often forget and then end up patching the bottom).polymer clay multi-color egg with holes

After the first cure, the areas marked are excavated, but i leave the egg shell within just so that when i cure the egg again and again after rows of colored rope are added, that the original calcium carbonate structure helps support the egg while it cures, if the areas are thin, sometimes they slump. After the initial cure i sanded the holes and added the black rim and cured again. So i just added rows and rows, maybe two at a time until the egg was covered.

After the final cure i removed the egg shell with vinegar (takes several hours and a little scrubbing and sanding), and then used aquathane just on the interior.  In this photo you can see just a little bit of the color showing through the translucent base.  I bet one could do this without the translucent base, but in my hands, sometimes the pressure cracks the egg…. the larger eggs seem to have less dense calcium structure.

Valentines day polymer clay egg and hearts

This egg is was made by covering an egg with a thin layer of pink polymer clay, and before curing, marking the holes to be excavated later with a cookie cutter type tool. This included a 1 cm hole at the very bottom of the egg which would be used to work with the wires. The egg was cured, then a knife used to finish cutting out the holes, and the holes and exterior of the egg sanded (as smooth as ‘mm’ allows time for it, sadly, never smooth enough).

Little hearts (also made with a cookie cutter, thick enough to have an eye pin inserted in the bottom as the stem, were made, i think 20 total. The initials of my grandchildren were stamped into one side of each of the hearts.  The hearts on pins were cured.  The eye pins were made from a spool of wire, as most needed to be longer than commercial wires. 

The pins were inserted in the holes and the ends brought out the bottom, and gathered together in a small lump of polymer clay (small enough that it could be pushed up into the egg after the wires were securely curedin the clay).  After that, wires were wrapped up over the lump of clay, and trimmed to only include a tiny “bend” over the lump.  A base, and a cover was fashioned for the egg and cured again.  After that, positioning the hearts within the holes was possible.

I had intended to decorate with marker and paint, the outside of the egg, and to put a wash over the embossed letters…. still will happen i hope, and i will post then another picture.  This photo was in the blinding sun and the snow…. not that great. haha.

Left over polymer clay cane on empty chicken egg

Truly this egg was a “throw together” from some well used, left over, not that great, slightly abused, polymer clay canes. It was really just a way to practice covering eggs, using what I likely should have thrown out in terms of left over polymer clay. But i kind of liked the abstract and unpredictable (though dark) way this turned out. Just looking at it now makes me want to make a “bar code” egg and see if i can get it through the Kroger scanner.  ha ha

Santa claus egg: up do for the beard

In a santa claus egg I made a few weeks ago, I decided I did not like how the “spiral cane worked out for the mustache so i edited it, as follows:  May not be an improvement, but I think i am through playing around. As usual, a little more patience and diligence could so improve my clay skills…. I havn’t figured out what part of my brain pushes me to another idea before the last one is complete.

santa claus polymer clay egg

Santa claus egg made with polymer clay and an egg shell

Still in christmas mode i guess… i arrived pretty late in that mode…. I will move to easter eggs momentarily. LOL

This santa was actually fun to make. I enjoyed the process, but of course didn’t take the time to make him “finished” in a pristine manner, he is just a learning “egg”.

I made the hat first, then cured it, but the egg (not covered with polymer clay) broke as i was sanding the hat…. so i found another egg, upon which the hat could comfortably sit, and covered that egg for face and the band of his hat and the piece of hat that no longer had “shell” in it. (I dissolved out the shell from the “hat” using white vinegar).   I put the translucent and white polymer clay jelly-roll cane on for his beard then cured again.  Sanded… also, no urethane on this one. santa claus polymer clay and egg shell egg

Santa claus polymer clay chicken egg

Santa claus polymer clay chicken egg: somehow all those words just dont seem to go into a sentence, let alone a title.  I laughed at the title. But in fact this is a chicken egg (emptied of its contents) covered first in a blue and white jelly roll cane where the beard and mustache go, then cured, then other elements added and cured again.  The original chicken egg remains inside.  It was a trick to try to sand this.

I will make a category called “apologetics” where i can ruminate on how i never get the outside smooth, and how these eggs rarely turn out like i envision them in the beginning. THis santa claus egg is no exception. If i ever did anything except prototypes, then perhaps something worth blogging about might come about.

He is cute to me at this time nonetheless, i like the impish expression. Photo taken in the morning hours of a wet snow-rain-ice mix.

santa egg made with polymer clay

Ostrich egg mosaic using dyed chicken egg shells

This was actually an ostrich egg that was left over from a dozen that I purchased 20 or 30 years ago. I began repurposing the egg about three years ago, thinking that the original design could be made into a mosaic design. I used chicken egg shells, cracked and emptied (for breakfast, ha ha) and washed and dyed in pysanky dyes just slightly crunched into small shapes and applied them with weldbond glue.  I have put a couple of layers of varathane on this egg, i am hoping to put many more on, sanding lightly between, to achieve a smooth finish (as the egg shells are NOT smooth obviously, ha ha). I didnt “grout” the spaces between the egg shells since there was already color on the egg which showed between the tesserae.

I will post a finished egg… I have no clue if the layers of varathane will ever create a smooth surface.  I am going to use a random sampling to estimate the number of pieces… ha ha. So i cut out of paper a frame of one sq inch, and held it over 8 different places on the egg and determined the mean number of pieces per sq inch was right near 60. I went online and googled “surface area of an oblate ovoid” and found two websites with a free online calculator. I put in the three measurements (3″ 3″ and 2.5″) for the ostrich egg and it came up with 89 sq inches, which ends up being just over 5300 pieces of egg shell glued to this ostrich egg.  ha ha