Translucent white and blue polymer clay cane easter egg

Translucent white and blue polymer clay cane easter egg which I will give away to one of my grandkids. I think it is kind of nice. It is made from the same cane as the previous post but I added blue to the outside before reducing the cane again. It also has pieces of the original cane without blue background. I did not try to remove the egg shell from this particular egg since I figured out on the previous egg that transparency was likely never going to be achieved. haha.

Translucent, white and a little color polymer clay

This began as a chicken egg, onto which I places slices of polymer clay cane which I made from a combination of two different types of translucent clay and white clay, adding the color in an hexagonal pattern. After curing I spent hours trying to dissolve out the egg shell from the center (using white vinegar and a syringe to put the spent vinegar out and the fresh vinegar in). All in all it is not that translucent but the snowflake flowers have a depth and the overall egg has a softness that is kind of nice. I sanded but chose not to put urethane on it.

More polymer clay eggs

Easter is still more than 4 months away but I am already having fun this year, just getting started with some very conventional designs and easy stuff. I took a leap and purchased 10 small ostrich eggs which should arrive soon. It has been about 2 decades, maybe more, since I ordered that first dozen. I have one left, and repurposed another which had been drawn on by sharpie…but faded over time.  This egg is primarily a single cane, pretty bright orange and some striped cane in places.


Ostrich egg: the first one I have made with polymer clay canes

I have made eggs with large paper mache base (both Hobby Lobby and Michaels and other craft stores carry the blank brown paper molded eggs, large and small). The large ones gave me a little bit of a problem because the clay shrank more than the base and they tended to crack.  I was a little worried that the polymer clay would shrink around this ostrich egg and show cracks as well.

Before I cured this egg i did use my blade to put a hairline cut down some portions of the pattern hoping to encourage the clay to split there so that I could repair it as part of the design. In fact however, the polymer clay did not shrink over this base…. I do not know why there was a difference in the brown paper egg and the ostrich egg, but that was my experience (again, a first try). You can have a custom ostrich egg, flower petal, polymer clay cane ostrich egg, to purchase HERE.

ostrich egg and polymer clay

ostrich eggs covered with polymer clay cane

First polymer clay egg for 2019

Christmas ornaments are not my fav to make, eggs are. As soon as christmas is over, it is on to decorating eggs and here is the first for 2019. Just a warm up, polymer clay spirals from left over memory bead clay that has flower petals ground up, and in this case some of the liquid amber balls, pine cones and flowers from mom and dad’s two houses (both i lived in), and flowers from mom’s funeral in 2018.

Paper egg and polymer clay

In a previous post I showed a paper egg (from Michaels) which I had covered in polymer clay just as an experiment and found a disturbing result, that is, that the polymer clay shrank over the paper egg and split. So I reasoned that the egg (which was quite large, maybe 4-5 inches in height and 3.5 or 4 in diameter) was part of the problem and so when i found a smaller egg (about 4 inches in height and 3 inches in diameter that it might work.

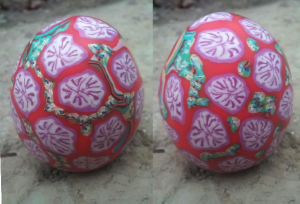
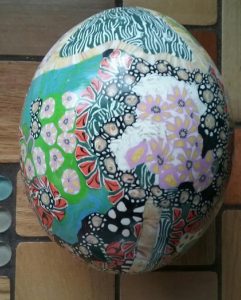
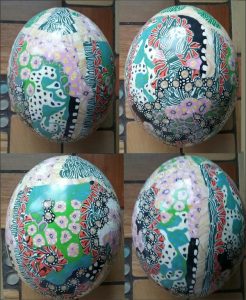
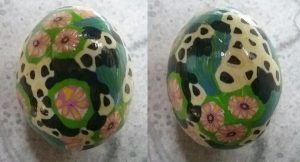
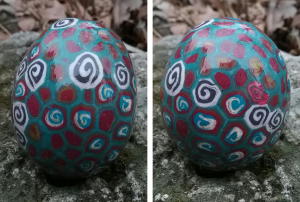
So again I set out to do a test to see if i could cover a paper egg of this size with polymer clay. I made the coating over the paper egg about 1/8 thick, maybe a little thicker, and rolled it smooth and then textured it.  The polymer clay in this case was all “left over” and you can see the flower petals it in from previous Memory-beads.com projects (see the yellow clay and pink spirals), so it is not what one would consider anything more than an experiment.  But sadly, it also cracked (vertically) in one area of black and white clay, maybe a split an inch long and sixteenth of an inch wide (barely visible) and another smaller split along the bottom.  I used left over polymer clay from the same areas to “fill” the splits (doming it up over the to of the cracks and also pressing it into the cracks (not an easy task) and cured it again for just a half an hour.  The result seems stable and I was able to sand the polymer clay smooth against the rest of the egg so the split is almost invisible…. but I likely wont experiment more using these brown paper molds.  The split didnt occur because i forgot to put a pin hole for air expansion in…. i did remember, but something in cooling and shrinking just didnt work well together.

Easter eggs: 2018 – metal cross and euphorbia milii cane

This egg was made for a friend who has been a wonderful training coach for running the Flying pig marathon.  Last saturday was the 20 mile run (day be fore easter this year – April 1).  The metal filigree brass colored cross was purchased at michaels, which I bent and shaped to fit an egg.  The euphorbia milii flower (two red petals and a yellow center) is called the christ plant and it carries a whopping number of ugly large thorns… actually an amazing number of thorns. It does grow in the middle east and perhaps (legend says) was the plant plaited into a crown of thorns. All i now is that whomever made that crown also got seriously injured.

These photos are not that great,  but you can see the metal cross and the flower cane on the back… and the light yellow cane behind the cross had fluorescent yellow powder kneaded into it (btw the powder makes the clay a little less fun to work with…. it feels like baking soda had been added to prevent sticking… LOL) bit after just a few hours in the kitchen window… it did fluoresce in the dark.