The egg shells (chicken egg dyed and broken into very small pieces) are used to create this tiny cockatiel egg mosaic. This egg is less than 1 inch in height. White glue used to put the egg shells on, and after drying, it was coated with urethane. The brown shells are from brown eggs, not dyed.
Category: Mosaic eggs
Chicken egg pieces dyed and used as tesserae for a mosaic chicken egg.
Egg shell mosaic by Pepsi
This was an egg shell mosaic on a chicken egg made by my daughter-in-law during their visit to Cincinnati, 2016. Awesome. The egg shells are dyed with traditional pysanky dies and then glue with white glue onto an emptied chicken egg shell. Coating is Varathane.
Egg with egg shell mosaic pieces
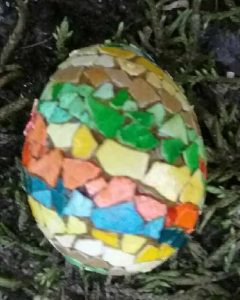
This mosaic egg was done (one of the first I did, as I recall) with egg shells that were dyed with traditional pysanky dyes, which are pretty intense compared to the typical egg dyes that one gets in the craft stores.
Eggs are emptied of contents (not necessarily carefully, but just any old cracked (and hopefully eaten) egg shells, and the little membrane on the inside of the egg shell removed with water and slight rubbing, and dried. I used yellow (as is typically done for pysanka, as a mordant and then moved the egg shells into the dye that I wanted them to be (in this case pink, green, and there are some natural brown shells as well. My tongue in cheek – art in this egg is that the egg shells at the top of the egg are expressly saved from the egglands’ best eggs, where they have their little “mark” unfortunately, washing the egg shells from egglands best marked eggs smears the mark a little. But you can still see it.
White glue is used to attach the mosaic pieces, and I think this coating is probably polyurethane.
Another chicken egg mosaic, chicken egg by Pepsi.
Egg shells dyed all shades of red and orange-dyed shells were crushed into small pieces and put into place on a blown chicken egg that first had been darkened with a black sharpie, with ordinary white glue. All sorts of different colors are available to dye broken chicken shells, but I use pysanky dyes that I get from the Ukranian Gift Shop. This egg was made during a visit from my son, and his wife (Pepsi) and my granddaughter (Corin).
Eggshell egg mosaic covered with translucent polymer clay
This was an experiment in how to make a smooth finish on an eggshell egg mosaic, which really wasn’t all that successful. I made the mosaic egg, per usual, from pieces of egg shells dyed with pysanky dyes and white glue as the adhesive. This was a brown egg to start – you can see it in the picture. After it dried I painted the surface with liquid polymer clay (Sculpey brand –which might have been not the best, in retrospect, but a higher end liquid polymer clay could have worked). After curing, I tried to sand the surface smooth but the liquid polymer clay did not create a strong enough coat to allow sanding. I put two coats of Varathane on, which seemed to work better. It is possible that a very thinly rolled covering of regular translucent polymer clay could have worked better. I will try it. I posted this in the #2016PCChallenge along with many other egg pictures.
Egg shell mosaic decorated egg
This is an egg shell on egg shell mosaic by my daughter in law Pepsi. My son and his family visited this week and we spent many fun hours doing mosaic and polymer clay.
Chicken egg mosaic
Chicken egg mosaic made with chicken egg shells and pysanky dyes, made the same way as previous post, this one has a red maltese cross design on each side, and a black background on the egg made prior to adding the colored shells.
Chicken egg mosaic using broken chicken egg shells
Chicken egg mosaic with chicken egg shells died with pysanky dyes. This is kind of fun for those of you who like tiny pieces to put together in interesting designs. I actually had some old pysanky dyes which I probably should have thrown out, but instead I took some emptied egg shells, and crushed them, and put them into the dyes, letting them sit until there was color. I just turned the eggshells out onto paper and spread them and let them dry.
Using a tiny bit of white glue, I positioned different colors of broken egg shell on a whole, but emptied, egg. When I wanted a dark grout like appearance behind the egg I used a black sharpie marker and colored the whole egg black then put the colored shells on.