Egg shell and polymer clay: snowman scarf and ear muffs

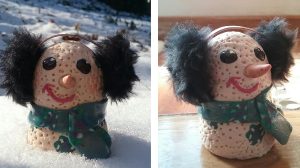
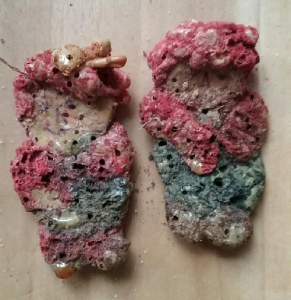
The base of this polymer clay and egg shell snowman is an extra large and a medium egg shell, emptied, covered halfway with thinly rolled white polymer clay.  I used a scalloped shaped cookie cutter (tiny tiny) to cut out the snowflake patterns from the uncured white clay layer over the egg. then created a blue and purple cane, and sliced it the same thickness as the white covering of the eggs, cut a scalloped shape and put it in the space where i removed the cut from the white layer. I rolled these two halves of the snowman smooth, then used the tip of a phillips screwdriver  to make the spikes in the snow added the coal eyes and carrot nose.  I cured the two halves, sanded and trimmed a little and then put them together with white polymer clay and liquid polymer clay.  i cured the pieces as one.  Then added the scarf.  Ear muffs were made from faux fur (a circle cut just bigger than the plastic drapery rings that i found lying around, and used as the base of the muff. I used hot glue to cover, and then also hot-glued the head wired (cut and bent to shape).

I would have preferred a bigger body and a smaller head, but didn’t have any eggs on hand that fit the bill the way i would have wanted…. so i used what i had–the story of all my art.  I did put varathane on the eyes, mouth and scarf.

Make your own scrubbies

I have been making my own scrubbies for a long time. It is so simple, and I thought i would share.  These are just the netting bags from oranges, cuties, apples and other fruit and veggies that get pitched into landfill (recycling is not an option for most of this stuff). Just cut the wire ties off the ends, roll them up and collect them into a bag that has a knot tied in one end and is turned inside out so the knot is inside.  Stuff it, twist and open the twisted end to go over the wad of netting again, and repeat, leave enough to tie a knot in the end, cut off part above the knot.  Its easy, and it saves 3 bucks and is good re-use of materials.


Mixed media egg

On this brown egg I made swirls with gold polymer clay and after curing it, I etched some dots in the spaces between the clay using wax, a kistka and then soaking in vinegar, and then repeated the process with other areas on the egg. The doodles are black sharpie, pink and white acrylic paint.  This was sort of a practice egg, to try out etching.

Egg – head brains

What mom do you know that would give this hand made brain to a daughter for christmas (LOL). Me, anatomist, biologist, science illustrator, nutty person, with a daughter just graduating from Wright State in behavioral sciences.

Real (emptied) chicken egg is the base of this egg head brain sculpture, covered with a very think layer of translucent polymer clay (to give it some stability). The folds in the brain were just made with a long rolled rope of translucent clay (which here certainly is not the highly convoluted brain of a very intelligent human) but is maybe like a mouse or rat.  You can still see some relevant convolutions, like the motor and sensory convolutions areas. I made the temporal lobe a little too flat, but it is still identifiable. The fun part was of course cerebellum with its unique surface patterning, convolutions on a different scale.

Olfactory bulbs and nerves and optic nerves are disproportionately large here, just for easy identification.  The egg brain can be removed from the stand and turned over where there is the optic chiasm, the there are mammillary bodies, and a pituitary (which would normally have been more hidden in the brain case, but I added here for fun).

Here is a link to read concerning a possible reason for convolutions, and a great video:

Up next: margučiai (mar-GOO-chay)

Lithuanian egg art, with wax, which is a little reminiscent to Pysanka, with the use of kista and dyes. This appears to be a technique where the dyed or natural egg has colored wax applied with a straight pin in the end of a pencil (convenient) and this is used to dip into melted wax (maybe a mix of bee’s wax for melting control and crayons for color) and applied in quick rhythmic strokes.  Can’t wait to try this.  I took a lot of searching to find the name…. everything was in a language I could not understand (LOL), which says something about my lack of linquistic prowess.  See someone’s photo here which I have credited by linking the picture back to their site.  They did a wonderful job.

Raggedy ann and andy bread dough ornaments, bit the dust.

Raggedy ann and andy bread dough ornaments, bit the dust.  I was really surprised (I don’t know why, I have had bread dough sculptures get moldy and soft and buggy before) when I unpacked christmas tree ornaments this year.  Ha Ha. Poor raggedy ann and andy….  they took a severe dusting this year in the cedar closet.  This is spookier than “walking dead”.

I had actually been a little sad looking at all the ornaments made with my children, and not a single one will be in town, nor any of my grandkids… So was just a bit sour, then found these, and that surely brightened the day.  Ha ha ha.

I don’t know what the half life for your bread dough ornaments is, but these have been around for almost 40 years.