I found this inexpensive bird cage wire ornament at a craft store and thought it was the perfect size for a polymer-clay decorated cockatiel egg. While this is actually a cockatiel egg, I made it a robins egg blue with white spots, and put it on a bed of red flowers as a christmas tree ornament.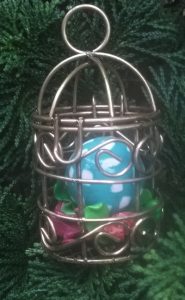
One of my kids made this ostrich egg pysanky. It was certainly a craft that they all enjoyed. I highly recommend it, almost everything comes out wonderfully. I have eggs that kids have done when it they required help holding the kistka. LOL.
The bigger eggs like this ostrich egg required several trips to the craft table, and a little planning. I wish I had figured out a way for them each to sign their ostrich eggs, as I cannot remember which of my boys (I don’t think this is my daughter’s) made this.

Watercolor and ink quick egg
I think this was a combined egg, with my grandaughter Corin, who visited this August. We worked on some things together. So this had some paint that didn’t dry (pink) I am not sure why, I don’t think it was oil paint, that is my addition, plus some shading. And then after 4 months it wasn’t tacky any more so I added some black sharpie, and a little Varathane. LOL, not terrific, but something to remind me of great family projects.

Mouse, snake and egg polymer clay sculpture
This was a little tongue in cheek (or mouse in snake) egg and polymer clay creation. There is a cute little grey mouse which is poking out of the side of a snake. The lump in the snake is created with a cockatiel egg covered with polymer clay, then hole drilled, and the body of the snake before and after was created with a rolled length of polymer clay then egg and body m olded together. The snake diamond cane was applied to the outside after the parts were cured together, and the little mouse, created and cured separately was wiggled through the hole. Positioning the mouse so that eyes and nose pointed outward was a little bit of a task (LOL). All in all, not my best egg sculpture, but it has a design potential to be fun to expand on.
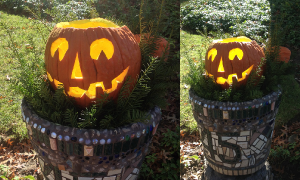
Pumpkin with fluorescent interior
I invented something funny here, at least I didn’t copy anyone else, but probably somewhere in the world someone has made carved a pumpkin like this and made the interior fluorescent. The idea came to me after I made a little pumpkin egg sculpture out of polymer clay (found HERE), and then I wondered whether I could make it into an actual pumpkin size carving.
- carve the pumpkin
- scrape the edges really well, and pat dry
- wait until the interior is pretty dry to the touch (I ended up putting this whole big pumpkin in the oven at just over 100 oF for an hour or so.
- Paint the interior with a stain blocking primer (I used water based Kilz) and let that dry for several days.
- Spray paint the interior of the pumpkin with fluorescent yellow spray paint (well I used spray paint, but I think a jar of paint would have been a better idea.
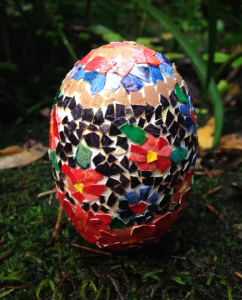
Egg shell mosaic by Pepsi
This was an egg shell mosaic on a chicken egg made by my daughter-in-law during their visit to Cincinnati, 2016. Awesome. The egg shells are dyed with traditional pysanky dies and then glue with white glue onto an emptied chicken egg shell. Coating is Varathane.
Dragon egg: polymer clay
This little egg was a construction nightmare to create. I don’t know how many processes of curing it took. I know getting the center continuation of the little dragon’s body was the toughest part. I like his tongue sticking out, ha ha. It began with a real chicken egg, as most of the eggs on this blog.

Egg cup: polymer clay flowers
This is a chicken egg, that is made into a little box or egg cup with lid. The flowers are made with polymer and flower petal mixture so that they actually can have some “keepsake” meaning, outside of just being an ornamental object. I can make something similar for you, contact me at this link MEMORY-BEADS

All craziness in a polymer clay egg with glass eyes
This egg was totally NOT fun to do, so many problems, and if you shook this egg you would find that one of the “glass eyes” was actually inside… ha ha, which I replaced with a clear marble after the fact. This egg was first covered in translucent polymer clay, then cured, and then I drilled out 5 or so holes, and used polymer clay to “seat” some glass globs within those holes. I cured it again, and added some of the stringing detail, then more and and more, and finally decided to cut my losses on this particular design. It looks like something “frosted” for a birthday. I use “primer” to paint the eyes, then put in the pupil, and then fluorescent yellow paint to make the white part glow. “certified” ha ha.

Pysanky goose egg: by one of my kids
We did a lot of pysanky eggs as a family. I loved that they all three loved to do this craft. There were many days and evenings with the candles and the kistkas and the dyes. I wish I had written on the bottom of this goose egg which of my three made it.
