Egg and polymer clay: Pumpkin with fluorescent interior

This egg was certainly fun to make. I used the roundest of the chicken eggs I had previously blown the contents from, then made wedges (thicker center than edges) to put around the equator of the egg top to bottom making the egg appear rounder and giving the pumpkin ridges.  I smoothed the wedges together and before curing i scored the areas for the eyes and nose and mouth and teeth and the top scallop where I could cut out the top.  the hole in the egg (to let the hot air escape during curing so as not to cause bubbles) was saved for the stem.  I sanded the egg lightly then cut the eyes and nose and mouth and top part out using a razor blade, trying not to break the whole egg.week_43_pumpkin-egg

After pieces were separated I used a blade to carve the edges clean, and sanded smoother (i didn’t sand this as smooth as i could have…. I am not that good a craftsman and bore too easily).  After sanding, i made the eyes of black polymer clay and added the stem to the lid, put a black ring for a stand, made a small candle which I placed in the interior and cured the egg again.  After some more sanding, I sprayed some fluorescent yellow paint into a plastic cup (one from the sampling at Kroger LOL, that I would feign to throw out) and painted the inside of the pumpkin (white eggshell still present acted as a nice white base color).

In the sunlight the eyes mouth and nose show up pretty nicely.  It is a fun idea, and would be a good craft for the kids.


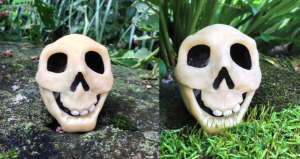
Bones (skull) egg: fun for halloween

This silly skull egg was made with a fluorescent powder (recommended by Ginger in blue bottle tree) and translucent polymer clay.  I kneaded in as much as I thought I could get away with, and the clay felt a little chalky.
Apparently I needed more.  It does glow a little in a dark room, but not enough to get a picture on my phone.  So here are two sunny views of the three toothed cranium and mandible.. ha ha… all made over an egg.

bones_egg

First basic layer was made (leaving eye and nose and mouth without polymer clay, and after the first curing, i just chipped out the eggshell in thoweek_39_fluorescent-skullse areas, and sanded around and chipped some more.  I then added the mandible and ridges over the eyes and zygoma and figured in where the teeth should go, and cured it again.  Lastly, I added the three teeth (the hardest part, ha ha), cured again, and painted with black and brown acrylic paint the inside of the head.  I thought about using pencil or ink to mark in the cranial sutures and foramina… ha ha. I am not totally sure why this guy looks so smiley for a skull.
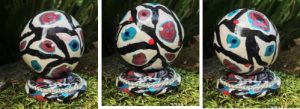
 

Crazy compound eyes: chicken egg and polymer clay sculpture

These past 8 days have seen two cataract surgeries.  In one sense awesome, and in another, disappointing just because man has not accomplished what nature has accomplished (beginning with the first photosensitive cells, developing quickly in the Cambrian Explosion period some 550 million years ago). I felt obliged to create something with polymer clay to remind me of the event, and show that I am grateful for the improved vision, yet know that what was lost was far more complex in design (yes, it had gone awry from occupational and environmental impact) than the lens that replaced it.

So here is an eyeball sculpture I call “ode to cataract surgery”.  Notice the little metal shield that I used as the compound eyeball – stand, was a leftover part of the recovery routine to protect the position of my new lens during sleep.

crazy_eye_egg_1


Early on, eyes were just eye spots, then photo-cups, later developing into pin-hole cameras, then cameras with optical chambers and mechanisms for focus.  Check out the wonderful wikipedia link HERE. What an astonishing range of adaptations emerged during evolution for the detection of reflective bodies in a range of wavelengths, for discrimination of various high and low light intensities, monitoring object motion and permitting real time adjustment in resolution. In most vertebrates the upside down and backwards evolution allowed for pigment cells to protect the rods and cones, an arrangement not present in many other eye types. And with this….I give you a magnificent quote ….“if numerous gradations from a simple and imperfect eye to one complex and perfect can be shown to exist, each grade being useful to its possessor, as is certainly the case; if further, the eye ever varies and the variations be inherited, as is likewise certainly the case and if such variations should be useful to any animal under changing conditions of life, then the difficulty of believing that a perfect and complex eye could be formed by natural selection, though insuperable by our imagination, should not be considered as subversive of the theory” (Charles Darwin).  I love it, even though it is a very run-on sentence (ha ha) it is right on point.

Here are a couple other views of the various crazy eye canes I made with polymer clay to create an compound eyeball sculpture over an emptied, and mostly round chicken egg.  Just fun. Yes, I think I will give it to my eye surgeon… who was also awesome, I wonder if he will laugh.

crazy_eye_egg_2


Topiary egg: polymer clay, egg shell, flowers.

This topiary egg was made with an empty chicken egg shell, which was covered first in a pale pink polymer clay and cured. Thereafter it was cut in a jagged way to simulate the cracking of a chicken egg. The halfs were covered with polymer clay canes (kind of a spiral) and cured again, and sanded. The center tree and flowers were constructed and affixed with liquid polymer clay and regular polymer clay to the bottom of the large portion of the egg shell and cured again.

topiary_egg

Egg with egg shell mosaic pieces

This mosaic egg was done (one of the first I did, as I recall) with egg shells that were dyed with traditional pysanky dyes, which are pretty intense compared to the typical egg dyes that one gets in the craft stores.

Eggs are emptied of contents (not necessarily carefully, but just any old cracked (and hopefully eaten) egg shells, and the little membrane on the inside of the egg shell removed with water and slight rubbing, and dried.  I used yellow (as is typically done for pysanka, as a mordant and then moved the egg shells into the dye that I wanted them to be (in this case pink, green, and there are some natural brown shells as well.  My tongue in cheek – art in this egg is that the egg shells at the top of the egg are expressly saved from the egglands’ best eggs, where they have their little “mark”  unfortunately, washing the egg shells from egglands best marked eggs smears the mark a little.  But you can still see it.
chicken_egg_mosaic
White glue is used to attach the mosaic pieces, and I think this coating is probably polyurethane.

Alien egg: a study in armature with polymer clay

This egg was just so fun to make, and I learned some things (which I always do when experimenting with polymer clay). I used two types of armature in the spines in the egg, which is sort of like an alien sea urchin, metal and wood. The obvious wooden armature is the small dowel of wood, one end of which I sharpened and the other was a bent wire. A third curly blue strand has no armature, but is also quite thin, and it did not slump under its own weight during three curing processes.

week_36_alien_egg

Step one was to cover an emptied chicken egg with translucent polymer clay (color probably doesn’t matter), a very thin layer, and before curing I carved an equator. After curing it was easy to just poke through the shell at the equator so I didn’t have to use my dremel (which makes a horribly dusty cutting event). This leads me to believe that if I can create other shapes in this same way, not just half-an-egg shapes.  I covered the half and created a “flat bottom” for the egg and drilled, by hand, a about a dozen holes (which i retrospect I would drill at a later point were I to do this again.  I cured the egg again, and added the rounded spots and made the spikes and curves and cured them each separately.  I trimmed about 1/8 to 1/4 inch of clay, exposing each armature, at the base.

Lastly I assembled the spikes and curls by pushing the exposed armature at the end of each into the holes I had drilled, using just a little bit of liquid polymer clay to insure a bond. I cured the egg again, and then added the balls at the ends of the spikes and curls (not the tiny blue one, as it would certainly have slumped under the weight. The balls were made with polymer clay and some yellow powder that causes the clay to fluoresce after exposure to sunlight.

Then lots of Varathane to cover.. ha ha.

Polymer clay egg box and pearls

This polymer clay egg box was made using left over clay (marbelized) smoothed with a brayer over a wooden egg (dusted with baking soda as a release). I carved an equatorial cut in the coating of polymer clay just before curing.  When the top and bottoms were separated with a knife, the flowers and leaves and beads were added.   I actually preferred, after this experiment, using whole eggs, not wooden eggs, as separating the wooden base from the cured clay wasn’t easy.

polymer_clay_egg_box