This is a polymer clay and chicken egg construction. It was a little bit of a challenge.
1) chicken egg was emptied of contents
2) covered with about an 1/8 inch thick layer of peach clay (I don’t much care for Michaels brand polymer clay, its brittle, I feel, more than other brands)
3) cured and then a dremel was used to cut the spiral (which was probably not the best way to do this – in the future I would add the cane layer and cure it again before cutting)
4) I added the cane to the outside and wrapped the spiral around another empty egg for stability (I used a twist tie or two) then cured the egg again.
5) I sanded it with the supporting egg still enclosed, then punched in the supporting egg when it was smoot h.
h.
6) Varathane coat was the last step — and now that it has sat in front of a hot kitchen window, it is beginning to slump a little. So there you have it, not everything works out the first time. I positioned it on its side…. and that is more interesting anyway.
Clown – egg head with moveable eyes
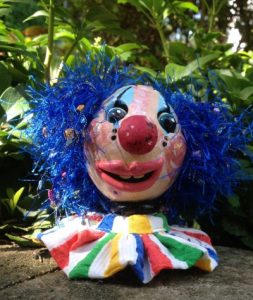 Smirky little grin on this egg, made from a chicken egg, polymer clay, fabric and yarn, and a little bit of paint and Varathane. Many steps here:
1) removing the egg contents (scrambled and consumed)
2) covering the egg with a thin rolled out layer of peach colored polymer clay and curing for 30 min
3) drilling out the eyes and mouth and back of head for a working approach to put in the eyes;
4) making polymer clay eyes, adding screw eyes and weights to the back of each of the eyes and painting the white highlights
5) building up the nose and mouth and re-baking
6) using a bent paper clip to create an arc through the eye beads, and hot gluing that in position making sure the eyes could flutter up and down, then using button thread to connect the screw eyes and tied-on weights up through a hole in the back of the head
7) using hot glue (carefully so as not to melt the polymer clay) to seat the back of the head where it belonged and adding hair
8) threading the button thread for the eyes through a little blue bead and tying it off (so the threads wouldn’t slip back into the egg cavity
9) building a stand (sawed off plastic thread bobbin)
10) making a ruffle.
Turtle egg
Just for fun, egg shell and polymer clay, and a little bit of imagination. The head is mobile, the legs and tail are fixed. This egg required several rounds of curing and lots of tricks. He has a belly that is made of the same polymer clay cane as appears on his back.

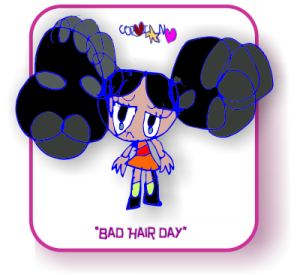
A very bad hair day?
Little girl here doesn’t like her hair-do, but like most things in life, bad hair days are just temporary. I can tell from the wild rounded lines that there was emotion in those buns on the side of her head. LOL. But, on the other hand, how nice to have such abundant, long black hair, and I think little girl is still beautiful. It gives us pause to think: how we see ourselves is important, and it colors how we feel at any given time. Think – good things. @2016
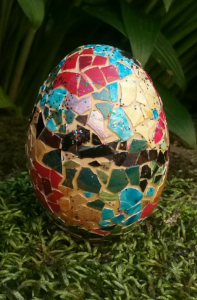
Fingernail polish on egg shells mosaic egg
This egg is not sterling by any stretch, but I posted it just as a record of using this technique, which btw I will likely abandon. I just painted some half-egg shells washed after cracking (for breakfast) and dried them and painted the outsides with fingernail polish abandoned decades ago by my daughter.
What is curious is that the fingernail polish changes the way the egg shells break, kind of an interesting twist. Anyway, the previous way of getting colored egg shels was using pysanky dye but that fades with time. Markers are ok but they leave the white edge around each piece (as does using fingernail polish) so these are just issues with this medium. I do like the egg to be black (in this case it was a brown egg shell and I did not change the color) as that gives it a stained glass, or mosaic, or tiled look.
I am happy hugging my friend!
This is so sweet and the sentiment is sweet as well. We should all hug our friends.