Polymer clay cane egg with forget-me-nots

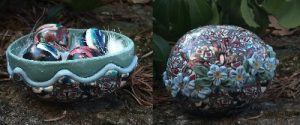
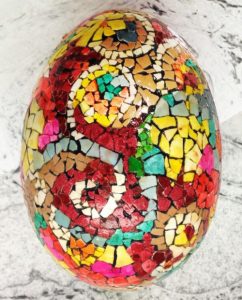
Work in progress — this egg, trying to figure out how to put a band on the lower half inside so that it closes like an egg-box.  Translucent clay was rolled thin and put on the egg first, and scallops were carved out before the clay was cured. After curing, an exacto knife was used to puncture the egg shell along the lines of the scallop. The canes were left over, just joined and rolled a little and randomly put on the top and bottom halves and the egg was cured again.  what I forgot to do was to bind the bottom half of the egg so that it did not expand (sag) just a little and make it too big to fit inside the top half.  I did some sanding then put both halves into the oven just to heat them up, then each one was shaped a little while it was still hot (using potholders).  I added a blue rim to the base half and forget-me-nots and leaves to the top edge and cured it again.

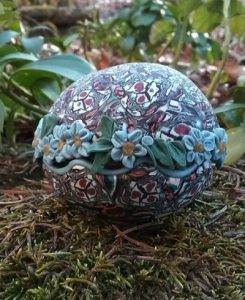
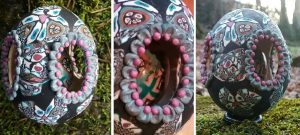
I did manage to build a shelf on the bottom half of the egg so that the top now fits over the edges….. and made some little eggs with the left over canes for inside.

Pysanky ostrich egg made by kids (2)

The technique of pysanka is so good for kids.  The risk is very small, and while the dyes can stain, hopefully a responsible adult is there.  My kids really loved doing it, and I have some chicken eggs that were made by kids as young as two and three…. i just held their hand so they didn’t get burned with the candle and kistka, but they directed (the scribble from the young ones) motion. We did mass numbers of chicken eggs and each tried their hands at several ostrich eggs.  Wish I could remember which of my three kids did this one (LOL and I wont wager a guess, they all developed similar, but still unique styles).  But I have kept it (them) for decades. These were some of the best hours of my “parenting life”.


Racing cane polymer clay egg with cutout and inner egg

Two eggs covered with polymer clay, mainly with a black and white racing flag cane and other stuff.  The inside egg was covered with translucent polymer clay, as thin a layer as i could roll. THen cured. Two holes drilled in top and bottom to house a tiny wooden dowel that went through and through the egg with short ends above and below to be secured later in the large egg.  A second layer of polymer clay was applied to the small egg (did i mention it was a cockatiel egg) and cured again.

The large (actually it was an extra large chicken egg) was covered with a thin layer of translucent polymer clay and cured, then with a knife it was cut in half, and the side portions cut out. I positioned the small egg inside the two halves of the large egg, cut out a little half circle in each for the stick, and used clay on top and bottom to secure the small egg inside.  Then cured two halves (and small egg) to stabilize them.

I next put a layer of black and white flag cane (along with other canes added) on the outside of the large egg, and cured once again.  Sanded, then and chipped out the egg shell from the inside of the large egg with a dental pick.  I did have to patch up a crease in the joint between two halves with black clay…. nothing i do is perfect, patching is a way of life for me.  Anyway i sanded out the windows, and added decoration.  I might add more. not sure. This is not a prize possession, obviously, but I enjoy the process of inventing.


Egg shell and polymer clay: snowman scarf and ear muffs

The base of this polymer clay and egg shell snowman is an extra large and a medium egg shell, emptied, covered halfway with thinly rolled white polymer clay.  I used a scalloped shaped cookie cutter (tiny tiny) to cut out the snowflake patterns from the uncured white clay layer over the egg. then created a blue and purple cane, and sliced it the same thickness as the white covering of the eggs, cut a scalloped shape and put it in the space where i removed the cut from the white layer. I rolled these two halves of the snowman smooth, then used the tip of a phillips screwdriver  to make the spikes in the snow added the coal eyes and carrot nose.  I cured the two halves, sanded and trimmed a little and then put them together with white polymer clay and liquid polymer clay.  i cured the pieces as one.  Then added the scarf.  Ear muffs were made from faux fur (a circle cut just bigger than the plastic drapery rings that i found lying around, and used as the base of the muff. I used hot glue to cover, and then also hot-glued the head wired (cut and bent to shape).

I would have preferred a bigger body and a smaller head, but didn’t have any eggs on hand that fit the bill the way i would have wanted…. so i used what i had–the story of all my art.  I did put varathane on the eyes, mouth and scarf.

Make your own scrubbies

I have been making my own scrubbies for a long time. It is so simple, and I thought i would share.  These are just the netting bags from oranges, cuties, apples and other fruit and veggies that get pitched into landfill (recycling is not an option for most of this stuff). Just cut the wire ties off the ends, roll them up and collect them into a bag that has a knot tied in one end and is turned inside out so the knot is inside.  Stuff it, twist and open the twisted end to go over the wad of netting again, and repeat, leave enough to tie a knot in the end, cut off part above the knot.  Its easy, and it saves 3 bucks and is good re-use of materials.