Quite large mosaic outdoor garden decor for easter (egg)

About one foot tall, this is a hollow easter egg made with concrete, then tiled with mortar and scrap tile (all scrap except the mortar and grout used to create this egg shape). It can survive outside, likely not in the freeze thaw of winter, but did survive last year outside in rain and heat.

I will deliver to anyone within 50 mi of Cincinnati – Cost 150$, please contact me.

Picture is taken on my own basement tile mosaic floor (LOL).

Very large mosaic egg

This mosaic egg (made with tile and mortar, after prep of a plastic egg purchased after last easter (LOL)) is hollow, weighing maybe 8 or 10 lbs, so it is not solid. I dont have any idea what would happen to the mortar if it were left to freeze and thaw, but for inside decoration, and sprint decorations I think it will survive for a few years.  It is almost two feet tall.  The hexagonal tiles are assorted hand made polymer clay tiles, and some donated from a local tile store.

The entire mosaic egg is made from scrap tiles (except the mortar and the grout are deliberate purchases from a local tile shop.  Just for fun.  Will deliver to anyone within 50 miles of Cincinnati…. cost is $200.


It is OK to laugh, photograph is taken on my mosaic tile basement floor.

Mosaic decorated ostrich egg: piano keys music

This is an old egg, the urethane i used on it for gloss has ambered, but i asked my sister (piano teacher, for whom i made it) to send me a couple pix just so i could remember what it looked like.   I hope i do better now…LOL. I also hope the aquathane that i use now for coating eggs doesn’t do what the old polyurethane did, but i wont keep my hopes up.   I made her a music egg using pysanky also long long ago (like three decades) as well.  The egg shells used to decorate this ostrich egg were dyed with pysanky dyes, then dried and crushed into medium size egg shell tesserae.

Ostrich egg mosaicked with chicken egg shells

Firtly –  the past tense of the word mosaic, is crazy…. mosaicked.  I looked it up.

Secondly – this egg is likely the first ostrich egg that I mosaicked with chicken egg shells dyed with pysanky dyes.  The chicken eggs were specifically died (just one mordant color – yellow, then the second color) for this purpose.  I found that the inside of the eggs dyed more intensely than the outer shell.. and while disappointing, I still used the pieces.

This egg was given to my mother, probably in the last century (haha… maybe 1990 or so) and went into the possession of my sister who photographed it for me.  I think in retrospect the tiny chicken egg shells needed to be organized in a more obvious design, here they seem kind of “lost” in the larger dimensions of the ostrich egg.

Eggshell mosaic: 4.5 inch egg, multicolor

Egg shells were dyed with pysanky dye, then dried and crushed and assembled into an abstract floral pattern on an apparently plastic egg which I just happened to find inside a paper egg purchased from Hobby Lobby.  The paper egg exterior i used for polymer clay egg (shown here) and the inside, which was pitch black, seemed to be the perfect background for an egg shell mosaic.  This particular egg took me about 10 hours (perhaps an unreasonable amount of time to spend on any egg, SMH) but for me it is a relaxing and unwinding task. Maybe one of you will appreciate it and give it to a friend or loved one for easter.


Breast cancer awarness ribbon: mosaic chicken egg

Breast cancer awarness ribbon: mosaic chicken egg made with dyed chicken eggs, with Egglands Best eggs with the breast cancer awareness pink ribbon logo stamped, and with regular white egg shell.  White ribbon on one side, and mosaic with the Egglands Best pink print on the other.

Instructions: emptied brown chicken egg as a base, glitter nailpolish over the pink ribbon logos on the Egglands Best egg to keep the print from “running”, lightly breaking the egg shells into small pieces, white glue as an adhesive, Aquathane as a glossing agent. This particular egg is free to whomever asks first.

egglands best chicken egg pink ribbon stamp mosaic egg breast cancer awareness

Mosaic eggs with fingernail polish

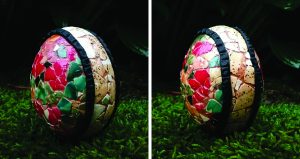
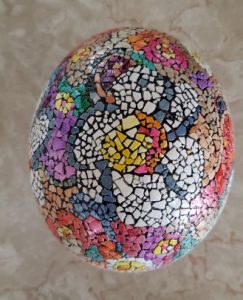
This was an experiment in mosaic and color and utilizing those left over bottles of nail polish (i dont use nail polish but my daughter does/did and these have been on the shelf for about 20 years). It was an opportunity to get great color, lots of gloss, glitter and do mosaic at the same time.
I just washed out the egg shells from breakfast, peeled off the inner membrane and let them dry. After that I painted the rounded side with various shades of nail polish. I broke the pieces of painted egg shell into the sizes that I was willing to work with, and glued them with slightly diluted white glue on to a whole shell (this one was a brown egg, contents blown out — and scrambled for breakfast as well).

The white border on this egg was glossed with clear polish with glitter on a white egg shell, but other colors were painted over brown eggs. This is just a matter of choice, and how dense you want the color.

After the glue dried, I glossed the egg twice with varathane. In looking at it, i felt it needed some kind of dimensional border between the white band and the flower area, so i made a thin rope of black polymer clay and placed it on the border between those areas, then cured polymer clay on the egg for about a half hour at 265 F. In an ideal world one would have roughened up the border with a little sand paper, and applied the polymer clay BEFORE glossing to make sure it would stick. I will see how long my black rim stays attached.
nail polish mosaic decorated egg

Ostrich egg mosaic using dyed chicken egg shells

This was actually an ostrich egg that was left over from a dozen that I purchased 20 or 30 years ago. I began repurposing the egg about three years ago, thinking that the original design could be made into a mosaic design. I used chicken egg shells, cracked and emptied (for breakfast, ha ha) and washed and dyed in pysanky dyes just slightly crunched into small shapes and applied them with weldbond glue.  I have put a couple of layers of varathane on this egg, i am hoping to put many more on, sanding lightly between, to achieve a smooth finish (as the egg shells are NOT smooth obviously, ha ha). I didnt “grout” the spaces between the egg shells since there was already color on the egg which showed between the tesserae.

I will post a finished egg… I have no clue if the layers of varathane will ever create a smooth surface.  I am going to use a random sampling to estimate the number of pieces… ha ha. So i cut out of paper a frame of one sq inch, and held it over 8 different places on the egg and determined the mean number of pieces per sq inch was right near 60. I went online and googled “surface area of an oblate ovoid” and found two websites with a free online calculator. I put in the three measurements (3″ 3″ and 2.5″) for the ostrich egg and it came up with 89 sq inches, which ends up being just over 5300 pieces of egg shell glued to this ostrich egg.  ha ha