Valentine egg: candy ropes and floral stamps and polymer clay

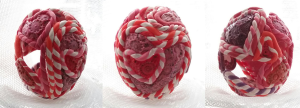
Valentine egg: candy ropes and floral stamps and polymer clay — this was such a fun egg to make and not that difficult. I began with an empty chicken egg and several twisted ropes of two contrasting colors of polymer clay. I dabbed on a little liquid sculpey to keep a couple of the heart outlines in place  then cured the egg.  I added more heart shapes and cured again, after all the stripey places were on i cut out sheets of polymer clay that fit the hearts, and stamped them with a old floral stamp i found lying around. then fit those cut outs into the hearts, tucking the edges down beside the cured two color ropes. After curing again, i punched out the inbetween egg shell and dissolved out the rest of the egg shell using vinegar (it took many hours and two changes of vinegar). I used triple thick clear and a little bit of black acrylic paints to “antique” the stamped areas.

To me it looks like candy…

Stamped floral polymer clay egg

This egg was made by covering an entire egg (don’t forget to poke the hole in the bottom to let the hot air out during curing) with a very thin layer of translucent polymer clay and cured the egg.  The purpose of this was to give the egg shell some stability so that when i pressed the stamp onto the next layer of polymer clay (a pretty thick layer of translucent polymer clay) it would not crush the egg shell. steam punk polymer clay impression egg

I did this second layer near my stove-top and oven to keep the clay pretty warm (so it was/is winter, and the house is barely 62 degrees, not conducive to conditioning clay) so that when i used a stamp (one found in a collection of rubber stamps) to impress the floral pattern on all sides it would make a deep impression. It was important NOT to cure the egg a second time before totally finishing the stamping and impressing the lines which might have become blurred  (this has to be pretty obvious).  I actually rolled it smooth a couple of times before i figured out how to handle the egg so as not to flatten out the embossing on the opposite side.  Egg was cured, cooled, sanded just a little bit, and a gloss medium mixed with various colors of acrylic paint just dobbed on the surface to highlight the impressions.  It was a fun technique to try, I think maybe at some point i will try it again.

It looks a little like steam-punk.  Ha ha, if i had used a metallic paint and black and grey it might have looked like metal.  That would be kind of fun, and one could use nuts and bolts and screws and washers and lock washers and gears and hex wrenches and screwdrivers etc etc to make the impression of common metal objects


Gingerbread and candy house 2013

These structures were pretty monumental, sometimes more than 2 feet tall. I loved doing these with the kids, miss it so much. I still have a blank candy castle form in my basement, waiting for a time when we can cover it with the containers of candy and cereal (well outdated, maybe 4 years outdated… LOL) that still are in my cupboard.  They were not perfect, but what the kids put, stayed, everyone did their own thing.

large gingerbread cookie candy house


Orbicular granite egg (made with polymer clay)

While making a couple of marble eggs i googled “granite” and “images” and was so taken by a particular kind of granite (orbicular granite) with its gorgeous round geode like places that i decide while i am making “faux rock” eggs with egg shells and polymer clay i would try to create one that might look like orbicular granite.  I think this egg (which i have just sanded to a smooth finish but not glossed) is really fun.  If you want to see some awesome real orbicular granite, google it.  There are not that many places in the world where such granite is found.

Resin half egg and pink flower

This egg was a total test. I have never cast a whole flower nor a large cast with resin. I used an uncoated egg shell (chipped off the top of a blown egg so i could insert the flower).  The flower (which i could not identify) had three heads each with many tiny flowers that were spikey.

I put a polymer clay base on this egg and a little decoration along the bottom edge. It is just made with left overs.  I did try to learn to use the ultra clear resin from resinobscession…. i have a lot to learn.  I chipped and etched off the egg shell (vingar) and sanded the top smooth and coated it with varathane.

Translucent and opaque polymer clay flower bowl

Translucent and opaque polymer clay flower bowl made over an egg shell, then egg dissolved (and chipped) away to reveal a scalloped border.  Fun to see through, and i think the next egg will have a black divider (grout or leading) look. This one has opaque turquoise clay, and the flowers are translucent spiral cane surrounded by the blue.  I haven’t finished this one yet, i am thinking that this needs some of the same flowers on wire (a little bit bendable and bouncy) centered in some radical wire base, that wont cover up the four flowers at the bottom?

Wonder what the topic for a stained glass – type egg will be… i can envision this as a creche… maybe a similar shape exterior as a stained glass window and a creche inside, maybe just the babe and manger.  Thinking on this.

polymer clay egg bowl of translucent flowers

Translucent polymer clay and partial eggs

I tried another experiment with translucent polymer clay mixed with opaque clay and a partial application of floral canes to real chicken eggs.  After curing i soaked the original egg shell (after i had punched enough away to allow it to fill) with white vinegar (about 5 hours). I sanded the interior to remove the last little bit of shell.

The wrapping of this cane around the egg is less “fun” than the previous yellow daisy egg in my own opinion, but an interesting technique to be sure. Someone who has more patience than i could use this technique to make some really beautiful objects.  For me, the invention is the fun part.  This hollow style egg would need some original kind of holder for display.

The open part of the egg is visible just a tiny bit at the top, and the lower left bottom one can also see the interior of the egg.

polymer clay and chicken egg designs