Just a few mistakes: ha ha but working and learning all the time

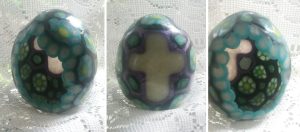
I thought when i began this egg that it would be really special, well not so, at least there are about 4 major flaws…as you can see in these photos. The point of the egg was to make translucent stained glass flower look with a cross at the back (inside) of the egg, which i almost pulled off, but not quite. I used the same cane that i had used for the previous blue flower translucent egg, just to test the black fimo as a “leading line” effect for making a stained glass appearance.

  1. i do wish the translucent premo clay was a little more “translucent”   I know there are better clays for this purpose, and have not invested in them to compare. I know that Blue Bottle Tree has done some studies  (this woman, if i may say so, is really a scientist, her approach works well for testing) on translucent clay so there are better clays for what i would have liked to achieve out there for me to play with.
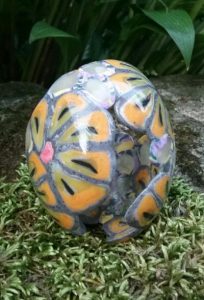
  2.  I left a big gouge in the top part of this egg, just careless, and in a hurry, as i always am.
  3.  I should have left more “light” space in the open side of the egg…
  4. and as usual, a little more sanding would have worked wonders.
  5. when i soaked out the calcium from the egg shell (took a day, and several refills with vinegar) i also sanded the inside, but I see on the right hand photo there is a little round spot covering a flower where the calcium still persists…. I will chip and sand that away.
  6. And worst of all, for some reason the side of the egg looks saggy? hmm  no clue, as the egg shell over which i built this polymer clay egg certainly did not have a saggy part.

But here are some pix anyway. I never like to give up on a project, and also need the visual reminders of previous mistakes so i am more apt to avoid making them again. Right and left photos are looking into the egg, middle photo is from the back.
polymer clay translucent flower turquoise blue shadowbox egg

Translucent and opaque polymer clay flower bowl

Translucent and opaque polymer clay flower bowl made over an egg shell, then egg dissolved (and chipped) away to reveal a scalloped border.  Fun to see through, and i think the next egg will have a black divider (grout or leading) look. This one has opaque turquoise clay, and the flowers are translucent spiral cane surrounded by the blue.  I haven’t finished this one yet, i am thinking that this needs some of the same flowers on wire (a little bit bendable and bouncy) centered in some radical wire base, that wont cover up the four flowers at the bottom?

Wonder what the topic for a stained glass – type egg will be… i can envision this as a creche… maybe a similar shape exterior as a stained glass window and a creche inside, maybe just the babe and manger.  Thinking on this.

polymer clay egg bowl of translucent flowers

Translucent and opaque polymer clay cane and egg shell cutout

THis is the fourth egg of the “cut out” style, I am improving. I love the translucency of this particular set of canes and the simple little scalloped border. Still not perfect, and also i had to repair the bottom since i forgot (once again) to poke an air hole in the bottom of the clay that was pressed over the hole in the egg where i emptied the contents. Air expands when it gets hot… LOL..i forget that.
Again, to remove the calcium of the egg shell, after curing the clay i punched out the sides of the real egg, and soaked in white vinegar for several hours, then sanded the interior.
polymer clay translucent and opaque canes covering a chicken egg

Yet another practice egg using the translucent clay and partial covering

This polymer clay egg is hollow, and the light can shine through to the interior. I used some translucent polymer clay and some colored clay and made a daisy cane which i applied to the exterior of a whole chicken egg (well, emptied but a whole shell).  After curing i punched out the uncovered egg shell and removed the rest of the shell in white vinegar (many hours) and sanded the interior of the polymer clay (and exterior). This one is coated with varathane.  I am having fun with this technique, and the sky is the limit.

polymer clay and chicken egg designs


Translucent polymer clay and partial eggs

I tried another experiment with translucent polymer clay mixed with opaque clay and a partial application of floral canes to real chicken eggs.  After curing i soaked the original egg shell (after i had punched enough away to allow it to fill) with white vinegar (about 5 hours). I sanded the interior to remove the last little bit of shell.

The wrapping of this cane around the egg is less “fun” than the previous yellow daisy egg in my own opinion, but an interesting technique to be sure. Someone who has more patience than i could use this technique to make some really beautiful objects.  For me, the invention is the fun part.  This hollow style egg would need some original kind of holder for display.

The open part of the egg is visible just a tiny bit at the top, and the lower left bottom one can also see the interior of the egg.

polymer clay and chicken egg designs


Translucent daisy polymer clay hollow egg

While i was looking at previous eggs i noticed that the translucent polymer clay was really interesting when molded around a shape and then the mold removed, as happened with the large paper egg covered with polymer clay HERE. I decided to experiment a little on partially open eggs that had enough contact points to stand alone when the egg shell was removed, and came up with this daisy egg. I think it turned out kind of interesting, and I followed it up with several more.

polymer clay covered egg translucent daisy

polymer clay and chicken egg designs

Novelty black and white striped egg with bumps

polymer clay and chicken egg designs

This too is just a fun, nonsense polymer clay egg. I had made the black and white flag stripes cane for my grandson, and had some left over. The egg is quite small, originally probably one from the “medium” size store bought eggs. The jumbo eggs, when used with polymer clay can turn out to be really quite big so purposefully I chose smaller eggs.

Silly egg

It has been only a couple weeks since i made this silly egg polymer clay and chicken egg designs
with polymer clay. At this point it was such a “non” for me that I cannot remember over what object I pressed the clay. I doubt it was an egg, but it must have been, as i would not have used a large wooden bead for this. But i post it just for fun.